Microsoft released Office 365 Groups as a new approach to team-based collaboration in October 2014. Since then, Groups have received a steady flow of enhancements ranging from the essential-for-adoption (Outlook 2016 support), interesting-and-useful (apps for iOS, Android, and Windows Mobile and connectors to harvest information from cloud data sources), to the not-so-good (the flawed integration with Power BI).
The pace of development for Office 365 Groups is impressive and illustrates where Microsoft’s current focus for team collaborative working is, all of which has thrown some doubt over Yammer, the “other” collaboration platform available to Office 365 tenants. The feeling that Office 365 Groups are top priority for Microsoft is deepened by the recent worldwide availability to Office 365 enterprise tenants of Planner, a lightweight task-oriented planning application that is tightly linked to Office 365 Groups.
You can think of Planner as Microsoft’s version of the Trello application. Trello has been around for a while and the two applications share many visual similarities, but the big selling point for Planner is its integration into Office 365. In terms of other competition, Planner needs to look no further than its big brother, Project Online, SharePoint, as well as third-party offerings for Office 365 task management, like ActionSpace or Tasks In A Box. It might be in competition with Excel, because that’s a tool long used for basic project and task management.
Planner has been in development for a long time (in cloud terms). The “Highlander” project was originally supposed to appear in mid-2015 but was held back to improve and refine its feature set. Planner is now available in preview to Office 365 First Release tenants who have licensed eligible enterprise plans (see Microsoft’s blog post for details).
Planning basics
Assuming you have an appropriate license, you can access Planner application with your normal Office 365 credentials by:
- Clicking on the Planner icon in the Office 365 app launcher
- Navigating to the Planner Hub at tasks.office.com
Microsoft is currently refreshing the Office 365 Groups user interface within Outlook Web App (OWA) and you’ll be able to access the plan associated with a group from there too. It’s not currently possible to access Planner from the Outlook 2016 integration with Office 365 Groups or from the Outlook Groups mobile app.
All routes lead to the Planner Hub (Figure 2), where you’ll find that all of the existing Office 365 Groups in a tenant show up as “Plans”. Every Office 365 Group has a corresponding plan and a plan can only be associated with a single group. Put another way, a 1:1 relationship exists between plans and groups. However, an Office 365 Group can exist within a plan but a plan can’t exist without an Office 365 Group. Figure 1 shows how the Hub displays Office 365 Groups as Plans, with those marked as favorites being featured. The “My tasks” link displays tasks assigned to the user from all plans.
 Figure 1: The Planner Hub
Any Office 365 Group that you’ve marked as a favorite shows up as a favorite plan. Likewise, if you mark a plan as a favorite, it shows up as a favorite group within Outlook Web App and Outlook 2016.
To work with a plan, you click the icon for an existing group or create a new plan. As a hopefully realistic example, I’ll describe how I set up the tasks involved in coordinating the creation of the “Office 365 for Exchange Professionals” eBook. We have used an Office 365 Group as the basis for collaboration since we started the project, so it seemed natural to use Planner as a more structured way of outlining and tracking the many tasks that go into the production of the book alongside the group library that holds the source documents and the shared OneNote notebook that records the “to-do” list and other information about the book. As it happens, creating the plan involved creating tasks based on the existing to-do list.
Tasks and Buckets
Tasks, which describe something that needs to be done) form the basic building block for a plan. Following the user interface design used elsewhere in Office 365, each task is represented as a card that holds information about the task.
Tasks are collected into “buckets” and are arranged on a “board” (I guess the analogy is to pin post-it slips containing details of a task on a board). Each plan starts off with a “To Do” bucket. You can rename this bucket and create as many others as you need. Think of a bucket as a collection of tasks that constitute a major section of a plan. It’s easy to see how buckets can be used to allow a group to coordinate several plans. In this scenario, each plan, or sub-plan, becomes a bucket.
Figure 2 shows the result of adding tasks into a couple of buckets as seen through the “Board” view. You can drag and drop the buckets to rearrange them into whatever order makes sense for the plan. In this instance, I set things up so that each bucket represents the tasks associated with a specific edition of the book. The sum of all of the tasks then constitutes the overall plan.
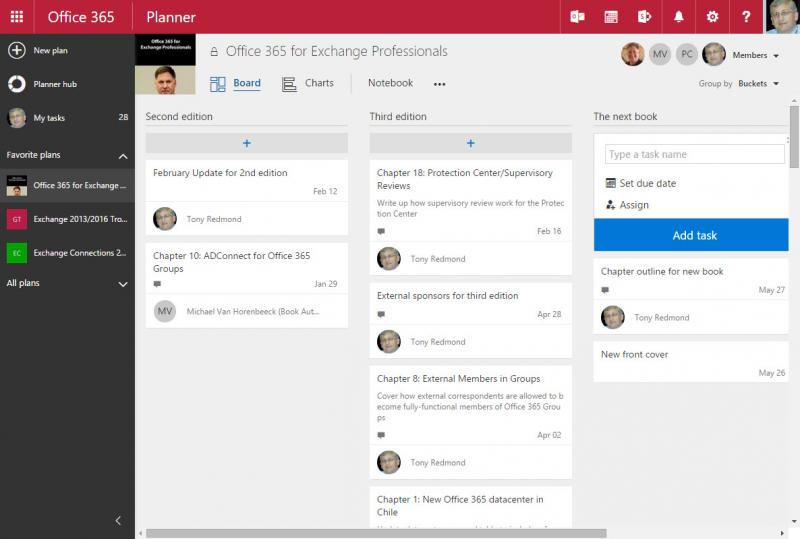 Figure 2: Tasks arranged by bucket within a plan
Tasks are listed within a bucket in an arbitrary order and there’s no way to select a preferred sort order such as by due date. However, you can move tasks up and down within the bucket to create whatever priority order you feel is appropriate. Once set, the order of tasks is retained. You can also drag and drop tasks between buckets to make sure that they show up in the right place. A nice touch in the UI is that if you click the icon for a group member (listed in the top right hand corner), the tasks assigned to that person are highlighted.
The options presented in the ellipsis menu […] include “edit plan” (really, edit the properties of the group), “leave plan” (leave the group), and subscribe (receive notifications via email). The representation of options that update the properties of a group or a group member underline the dependency that a plan has on its underlying group.
It’s possible that you make a mess when setting up a plan and want to start over. A complete bucket can be selected by clicking its name and then Delete Bucket from the ellipsis menu. If you want to blow away the complete plan, go to the ellipsis menu for the plan, select Edit Plan and then Delete Plan. You’ll be warned that if you delete the plan, the underlying Office 365 Group and all its resources will be removed. Office 365 Groups don’t currently support a soft-delete capability, so a mistake made here can lead to catastrophic data loss.
Charts
The Charts view (Figure 3) presents a different way of looking at the plan. In this case, it shows that I have far too much work to do because the majority of the tasks have been assigned to me. We can also see that the project hasn’t really made much progress as only two of 34 current tasks are in progress and two more are complete. The tasks are listed on the right-hand side of the screen. In this case, tasks are ordered by due date, but they can also be sorted by “assigned to”, “progress”, “buckets”, and even “no grouping”.
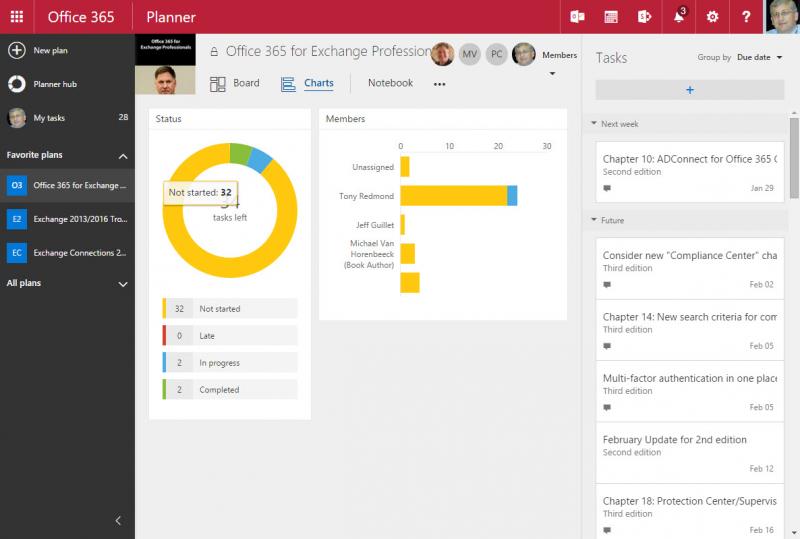 Figure 3: The Charts View
Clicking a section of the chart will list the underlying tasks in the far-right column. For instance, if you click the “not started” section of the round chart, all of the tasks that are not yet started are listed. On the other hand, if you click the line for a user in the bar chart, the tasks assigned to that person are listed.
With just one option available, the Charts View is pretty basic at present and it would come as no surprise if Microsoft was to build out this feature over time. For example, a timeline view is an obvious candidate to add here as plans tend to be measured by date as it would be very convenient to be able to drag and drop tasks along a timeline and have their due dates adjusted accordingly. Other date-oriented applications provide a calendar view where items appear on their due date. And it would be nice to be able to see charts for the tasks in a bucket rather than the complete plan.
Creating and managing tasks
Creating a new task is very straightforward. Figure 4 shows a group member being assigned to a newly created task. The membership of the group is used to populate the drop-down list. Tasks can also be left unassigned, and if someone leaves a group after tasks are assigned to them, their tasks remain assigned to them until the tasks are reassigned to someone else. You can’t add more than one person to a task – or even a group to a task. You also can’t add a user outside your Office 365 tenant to a task (even on-premises users linked by a hybrid connection), which might be required if an external consultant or other third party is associated with a project. This is likely because Office 365 Groups don’t support external members at present. According to the Office 365 Roadmap, this limitation is due to be lifted and when it happens, you’ll be able to assign a task to an external person. In the meantime, it seems like the lack of support for external members might be a problem for some projects where external expertise from consultants, project managers, architects, and other professionals often supplements the knowledge available from internal resources.
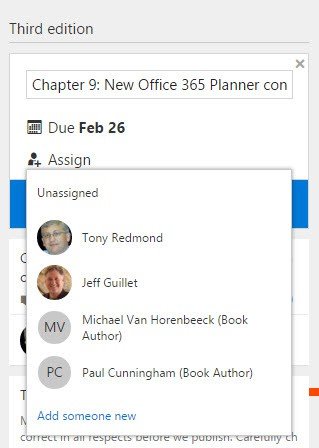 Figure 4: Assigning a group member to a task
A quick way to assign a task to someone is to drag and drop the icon for the user onto the task.
When someone is assigned a task, a note is sent to all members who have subscribed to the group. This is certainly one way to update the group that someone is now responsible for a task, but it does mean that when a new plan is being created for a large group, a large number of updates might be sent in quick succession as tasks are set up. Some refinement in this area might allow group administrators to decide that only an assignee should receive an update when they are nominated as responsible for a new task or alternatively, an option could be provided to generate and send a digest containing details of all current task assignments to group members.
Notice the “Add someone new” option on the bottom of the list of group members shown in Figure 4. In order to be able to assign a task to someone, you have to add them as a new member to the group. This is logical, but it has the consequences that the new member then gains access to the full suite of resources available to the group including all of the items in the group document library. Remember, an Office 365 Group represents a single identity when it comes to access and all members enjoy the same level of access when they join. In other words, you can’t add someone to a plan without also granting them group membership, which might or might not be desired. And because Office 365 Groups allow the same level of access to all members, there’s no ability to permit someone to have view-only access to a plan.
The fact that everyone in a group shares equal access to the plan is bound to be unpopular with some. Anyone can create or edit a task. Anyone can assign a task to someone else in the group or reassign a task that they have received to someone else. Anyone can delete a task or update the progress of a task.
It’s all very self-liberating and empowering, as long as you’re prepared for this mode of working. If you need more hierarchical form of management where only defined members can add, change, or assign tasks, then you need to use traditional project management software such as Project Online. Another option is to use the “Project” template for SharePoint Online to create a site to hold tasks for a project. Out of the box, this won’t deliver the same kind of UI that Planner provides, but because it uses SharePoint, a world of possibilities exists as to how to customize and organize the site to meet your requirements.
Building out tasks
The detail for newly created tasks is sparse with just enough information gathered to be able to populate the card. This might be sufficient for some plans but not for others. To build out a task, select and click it to reveal a form (Figure 5) including the start and end date and current status. You can also input an expanded free-form description of the task that can replace the title in the card for the task shown to users.
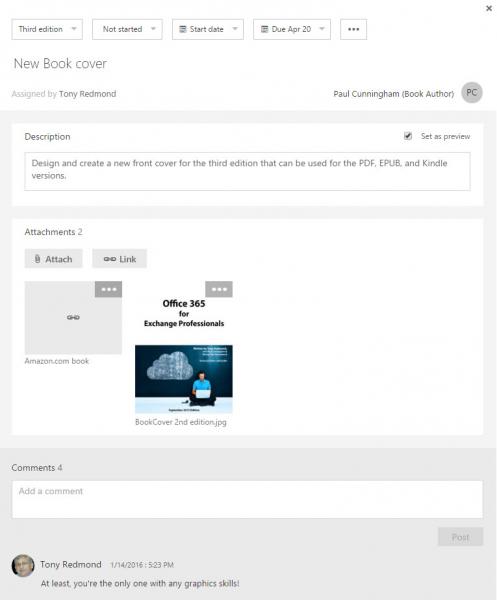 Figure 5: Expanding the details of a task
If you want to have a graphic show up as the preview for a task, you can click the […] menu for the object and set it to be the preview.
You can add attachments to a task from the OneDrive for Business site associated with the group or a file from any drive visible to your computer. Files that are uploaded to be attached to a task are stored in the root folder of the group document library. The same file cannot be uploaded twice as it would cause a duplicate file in the library, but once uploaded to the library, a file can be attached to multiple tasks. In Figure 5, you can see that URL links can also be added to a task. In this case, the task has both a file attachment and a link to help the assignee understand what needs to be done to complete the task. In addition, Planner doesn’t support the ability to assign multiple people to the same task, so if you need to define work that is a shared responsibility, you have to create separate tasks for each assignee.
[Update: Feb 10] Checklist items can now be added to a task.
Task status
A task can be in just three states – not started, in progress, and completed. There’s none of the precision and exactitude of measuring a task to be say 87% complete but the simplicity is appealing as it’s easy to know whether a task has started, is being worked on, or has finished.
You can also assign colored labels to tasks (Figure 6). This might be useful to indicate high-priority tasks or those that need to be flagged because they are experiencing some problems or need specific attention from someone. You can assign whatever name you want to the labels and the names remain constant for all tasks in a plan. However, in line with the previous comment that everyone in a group shares equal access to a plan, anyone can decide that they want to change a label and update it, which seems liberating but odd. I’m not sure that I want my “Important” red label updated to be called “Can be ignored” without any hindrance. Perhaps only group administrators should be able to update the text for labels.
 Figure 6: Adding labels to a task
Managing tasks is a matter of updating their status as the work unfolds. Tasks will be completed and their status can be set as such. Some tasks will need to have their dates adjusted to reflect changing circumstances, new tasks will be added and perhaps some will be deleted. Eventually, everything will come together and all of the tasks on a board will be complete. And then, when all the tasks on all the boards are complete, the plan is done.
Comments and conversations
While the work is ongoing to complete tasks, it’s likely that some communication between the group members is required and that’s where conversations come in. Or rather, “comments” on tasks, for this is how Planner refers to them.
As tasks are created and assigned to people, conversation items are created in the group mailbox. People who have subscribed to receive updates from the group will receive these items in their mailbox, meaning that when you create a new plan for an existing group that has a large set of existing subscribers, they will receive a notification for each task added to the plan. They’ll also receive notifications when tasks are complete. The email notifications help group members keep track when they and others have been assigned items as well as knowing when tasks are complete.
Comments can also be added to tasks. In Figure 7 we can see that that a task already has four comments and a new comment is being prepared. The editor used to input the text for comments is pretty simple and straightforward (which is a polite way of saying “rudimentary”). It doesn’t support any form of text formatting that I could find, including the standard keyboard shortcuts such as CTRL+B fot bold, CTRL+I for underline, and so on. If you want to add emphasis to your comments, you’ll have to use a different Office 365 Groups client.
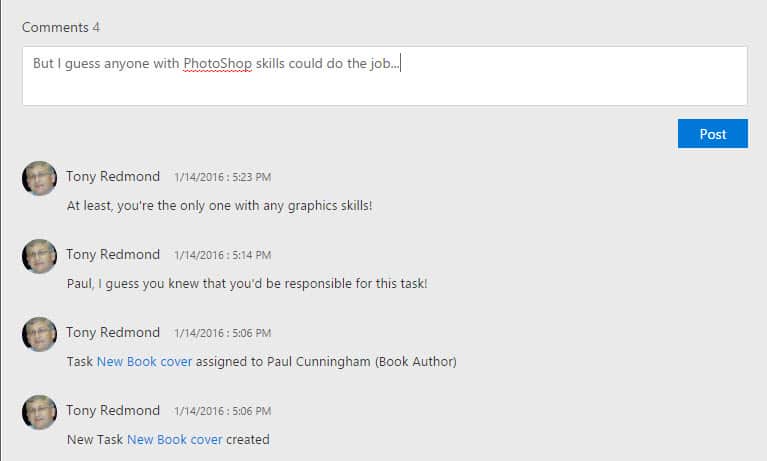 Figure 7: Comments for a task
With the exception of the comment about the new task being created, the comments are posted to the group mailbox to form a threaded conversation. Items added to the conversation using any of the clients available for Office 365 Groups will also be added as comments for the task. I found some issues dealing with graphics pasted into conversations using Outlook 2016, but these are probably teething issues that will be dealt with before Planner reaches general availability. And, as you’d expect, if you delete a conversation using Outlook Web App, all of the comments for the associated task disappear.
You need to have an Exchange Online mailbox to be able to add a comment to a task. Behind the scenes, Planner uses the REST-based API for Groups to post comments and just like any of the other clients for Office 365 Groups, this can only happen when a connection exists to a mailbox. When a client posts to a group conversation, the item is submitted through the Exchange transport system in order to apply transport rules before content shows up in conversations. For example, a rule might block someone from posting sensitive data such as credit card information. Another might stop the posting of any text containing an offensive term. The requirement to have an Exchange Online mailbox means that Office 365 users who don’t have this license can’t use Planner.
Figure 8 shows how the comments for a task show up as a conversation in the group as viewed from Outlook 2016. You can “Like” an item in a conversation but it won’t show up alongside the comment in the task.
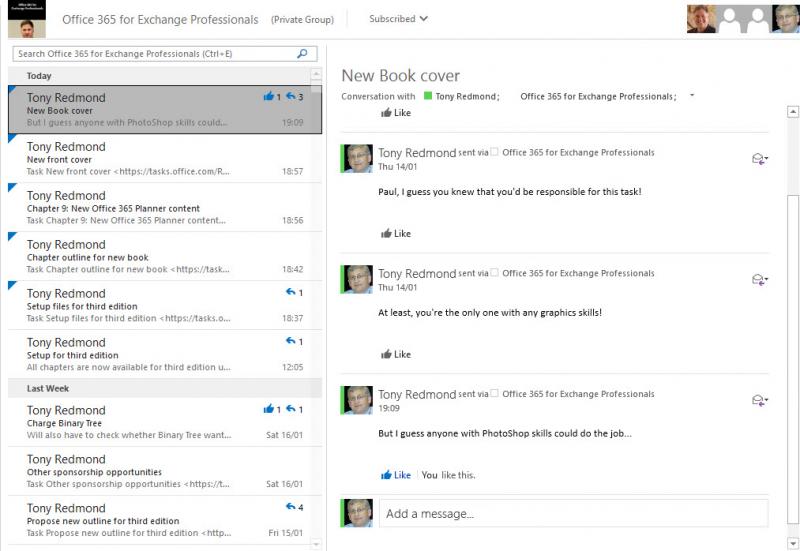 Figure 8: How Outlook 2016 displays comments for a task in a group conversation
It’s natural to ask where all of the information for a plan is held. The simple answer is that the metadata for a plan, including information about tasks and buckets, are stored in a tenant-specific cloud service in the plans.office.com site. The links to an Office 365 Group for membership, conversations, and file storage, are part of the plan metadata that remains hidden to the user. As far as they’re concerned, plans are a unified entity, which is what you’d like people to think. There’s no point in exposing seams and joins to everyone.
Clients and integrations
It took over a year before Microsoft created an integration between Office 365 Groups and Outlook 2016 and about the same length of time before a mobile Groups client showed up, so it perhaps is no surprise that a browser is the only current interface available for Planner. Given that tasks are accessible through the Microsoft Graph API and that Microsoft seems keen on generating as many mobile Office 365 apps as possible, I expect to see an app appear soon. Microsoft has also indicated that they want to create a link between Planner and the Wunderlist personal app that they acquired in June 2015.
Creating a link between Planner and Outlook requires more thought. One idea is to expand the current Groups integration with some extra UI if a plan is associated with a group. Even a link to the plan in the Planner Portal might be sufficient to start. Another idea is to create an Outlook task in a user’s mailbox when they are assigned a task in a plan. This is more problematic because it creates a need to synchronize updates between tasks stored in Exchange Online and the Plans cloud service.
Given that sales operations are usually task based and that an integration already exists between Office 365 Groups and Dynamics CRM, a future link-up between Planner and Dynamics CRM might be on the cards.
Some issues in creating plans
Creating a new plan is easy. If they haven’t used Planner before, a user can navigate to tasks.office.com and log onto the Planner Hub and create a new plan (Figure 9). Creating a new plan also creates a new Office 365 group, even if the user is prohibited from doing so in the normal course of events. In addition, if a group naming convention is in force, it’s ignored too. The new group comes complete with all of the resources that you’d expect, including a document library.
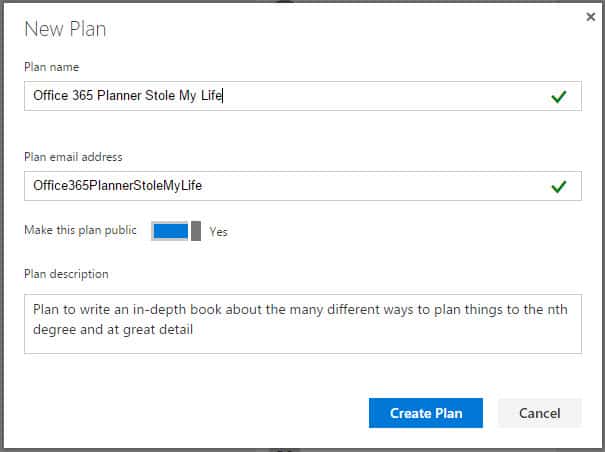 Figure 9: Creating a new plan
The reason why any user can create new plans (and groups) is because Planner, like the Power BI integration with Office 365 Groups, ignores the OWA mailbox policy that currently provides the mechanism to restrict users from being able to create groups. In one way it’s logical that applications that have no link to Exchange should ignore settings contained in an OWA mailbox policy. However, the policy is the way that Microsoft chose to control group creation and it’s a pity that the developers who integrate other applications with Office 365 Groups ignore the restrictions put in place by tenant administrators, usually for good reason.
Even if they have designed Office 365 Groups to be something that can be deployed without the benefit of IT oversight, Microsoft knows that some control has to be available if a tenant wants to restrict the creation of new groups. The answer is clearly not to persist with the OWA mailbox policy, which served its purpose when Groups were new and OWA was the only client. The future lies in an Azure Active Directory (AAD) policy that will be supported by all applications that need to create new groups. According to the Office 365 Roadmap, the switchover to the AAD policy is due to happen “soon”. It can’t come soon enough.
Plan Lifecycle
In the current implementation, plans that have no active tasks are simply left alone. There’s no method provided to archive tasks from a plan to start afresh and commence a new planning cycle as you might do at the start of a new fiscal year. You have to clear out old tasks manually by deleting them from a plan before you create any new tasks.
It would be nice if Microsoft provided a feature to “reset” a plan by moving all completed tasks into an accessible archive where they might be retained for records purposes for a set period. Even better, it would be good if administrators could assign a policy to plans to govern their lifecycle and conduct automatic archiving.
Of course, archival not just a matter of simply moving tasks because tasks can contain associated documents and comments that “belong” to the Office 365 Group. Removing this data without thought could have unforeseen effect on the group so thought would therefore have to be given to how to preserve this data. One approach is probably to copy documents and comments from the Office 365 Group and archive this data along with the tasks. As always with data, it’s best to be safe than sorry.
Mention of archiving brings compliance to mind. Office 365 includes a comprehensive suite of compliance technology for Exchange Online and SharePoint Online. Although some notable gaps still exist, Office 365 Groups are gradually coming under the influence of compliance policies. It would be good if retention and preservation policies applied to Planner as well. The documents and comments stored in Office 365 Groups are indexed and discoverable in public groups (private groups are still an issue for eDiscovery), but the tasks and the plan metadata should be indexed and discoverable too.
A lack of auditing
As part of the Office 365 Compliance Center, the Unified Auditing project is bringing together audit information from different applications across the service and providing a single place for administrators to query. Right now, no actions associated with plans are recorded for audit, so you won’t be able to find out who created a task or bucket – or possibly even more important, who removed one of these objects (or changed the text for a label). This is not altogether surprising because it takes time for auditing to pick up new applications. Audit events for standard Office 365 Groups have only recently been added to the service.
Summary
There’s lots to like about Planner. It’s easy to set up tasks and organize them into buckets and the integration with Office 365 Groups brings threaded conversations, a shared calendar, document library, and OneNote notebook to the mix, all of which are useful tools for many small projects. Planner is obviously not a project management tool and its lack of sophistication and control over the planning process means that it will never be such. More charts would be welcome as would an integration with Outlook, a mobile app, support for external users, and support for automated lifecycle and compliance.
As it builds out the capabilities of Planner, Microsoft has to walk a fine line between it and their full-function Project Online application. The trick is to make Planner useful to as many people as possible without taking away any opportunity to sell Project. Another thing to remember is that Planner is not yet generally available to Office 365 tenants and that some more fit-and-finish is likely to be applied before it reaches that point. And given the speed in which functionality changes in cloud services, some of the issues highlighted here might well be addressed by the time you read this article.
The ease of use and simplicity in Planner is appealing. It delivers enough to satisfy the organizational requirements of many small to medium projects where the prospect of breaking out some heavy-duty project management software is a step too far. Overall, Planner is a welcome addition to the functionality Microsoft makes available in its enterprise Office 365 plans.
{{cta(‘6721760a-6975-42ef-a37b-39e07e6fcbfc’)}}
Follow Tony @12Knocksinna


